

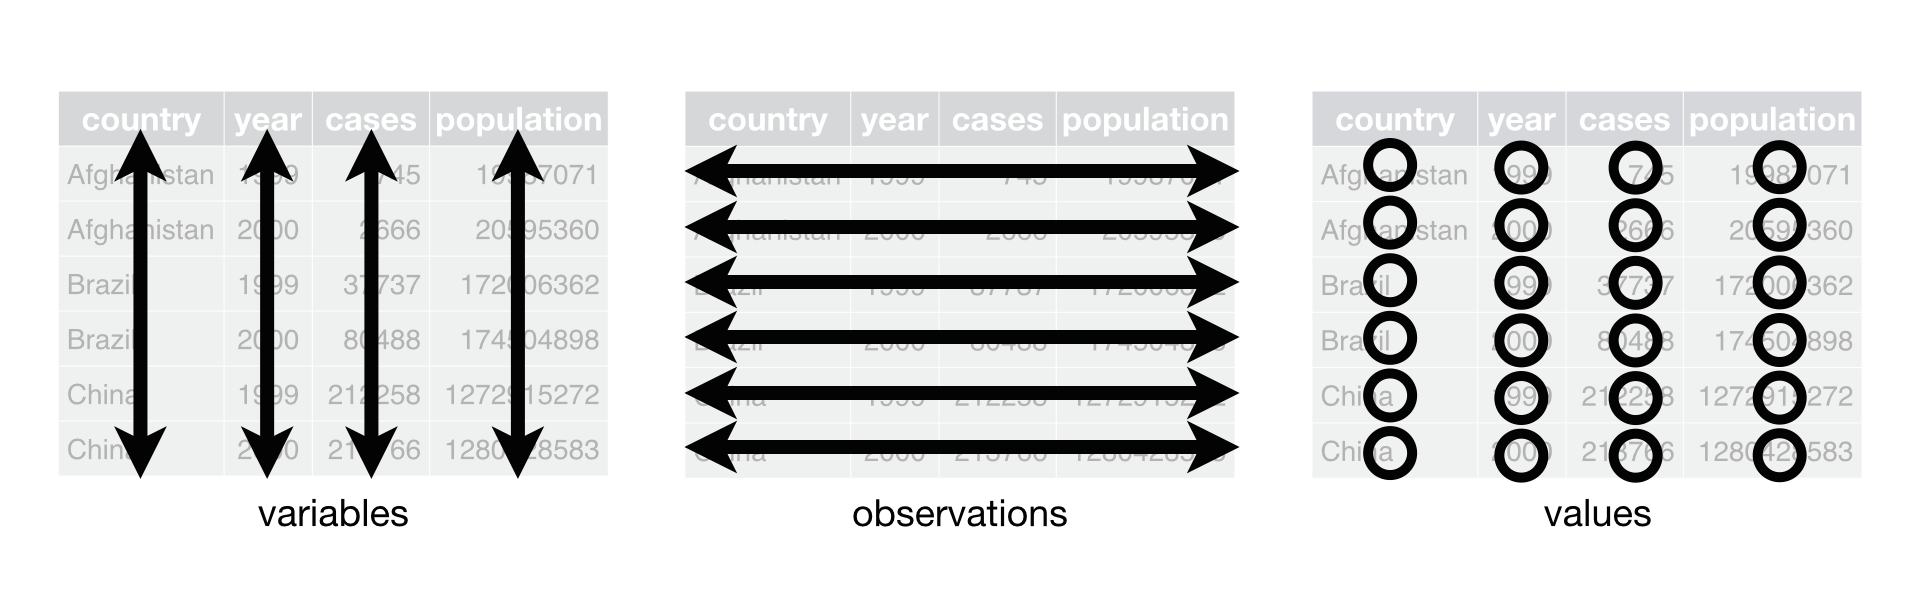
In data analysis, we usually want our data in a rectangular data frame; one row per each observation and one column for each attribute. However, unfortunately, not all data come this way. Even when the data satisfy the “one row per observation” rule for an analysis, they don’t necessarily do so for another, and we need to reshape it. Tidy data is a concept referring to a standardized way of shaping data. In the principle of tidy data, each variable is stored in its own column and each observation is stored in its own row. For example, consider data below:
library(dplyr)

student_id <- c(1, 2)
exam_grade <- c(87, 94)
homework_grade <- c(92, 89)
quiz_grade <- c(88, 92)

grade <- tibble(student_id, exam_grade, homework_grade, quiz_grade)
grade
## # A tibble: 2 × 4
## student_id exam_grade homework_grade quiz_grade
## <dbl> <dbl> <dbl> <dbl>
## 1 1 87 92 88
## 2 2 94 89 92The data above is not tidy. This is because two variables, “assignment_type” and “grade” are not separated in its own column. In a tidy format it should be as following:
library(tidyverse)## Warning: package 'tidyverse' was built under R version 4.3.2## Warning: package 'lubridate' was built under R version 4.3.2tidy_grade <- grade %>%
pivot_longer(cols = -student_id, names_to = "assignment_type", values_to = "grade")
tidy_grade## # A tibble: 6 × 3
## student_id assignment_type grade
## <dbl> <chr> <dbl>
## 1 1 exam_grade 87
## 2 1 homework_grade 92
## 3 1 quiz_grade 88
## 4 2 exam_grade 94
## 5 2 homework_grade 89
## 6 2 quiz_grade 92We see above that one variable of a data has its own column, and one observation of a data has its own row. By organizing the data in this way, it becomes much easier to perform common data manipulations, such as filtering, grouping, and summarizing. Another more realistic example is:
library(tidyr)

head(relig_income, 10)
## # A tibble: 10 × 11
## religion `<$10k` `$10-20k` `$20-30k` `$30-40k` `$40-50k` `$50-75k` `$75-100k`
## <chr> <dbl> <dbl> <dbl> <dbl> <dbl> <dbl> <dbl>
## 1 Agnostic 27 34 60 81 76 137 122
## 2 Atheist 12 27 37 52 35 70 73
## 3 Buddhist 27 21 30 34 33 58 62
## 4 Catholic 418 617 732 670 638 1116 949
## 5 Don’t k… 15 14 15 11 10 35 21
## 6 Evangel… 575 869 1064 982 881 1486 949
## 7 Hindu 1 9 7 9 11 34 47
## 8 Histori… 228 244 236 238 197 223 131
## 9 Jehovah… 20 27 24 24 21 30 15
## 10 Jewish 19 19 25 25 30 95 69
## # ℹ 3 more variables: `$100-150k` <dbl>, `>150k` <dbl>,
## # `Don't know/refused` <dbl>As a report, the table above is easy to read and is well summarizing counts per each combination of levels two variables: religion and income. However, since variables in the table are encoded in the row and column names, it is hard to use when modeling functions in R. So we can reshape the table into an easier form, while maintaining all the same information as below:
tidy_data <- gather(relig_income,
                    key = "income",
                    value = "count",
                    -religion)

head(tidy_data, 10)
## # A tibble: 10 × 3
## religion income count
## <chr> <chr> <dbl>
## 1 Agnostic <$10k 27
## 2 Atheist <$10k 12
## 3 Buddhist <$10k 27
## 4 Catholic <$10k 418
## 5 Don’t know/refused <$10k 15
## 6 Evangelical Prot <$10k 575
## 7 Hindu <$10k 1
## 8 Historically Black Prot <$10k 228
## 9 Jehovah's Witness <$10k 20
## 10 Jewish <$10k 19The melted data frame above might be harder to look at a glance, but is much easier to perform analysis!
Reshaping Data
Melting
Conceptually, in a dataset, variables can be categorized as either identification variable or measurement variable. The identification variable uniquely identify each observation in a row. You can think of it as a primary key in a relational database. On the other hand, the measurement variables are actual measurement values in columns.
The melt function in the
reshape2 package transforms wide-form data, where
measurement variables occupy multiple columns, into a long-form. This
process, often called unpivoting, essentially converts
measurement variable columns into rows while keeping the identification
variables fixed.
For example, let’s consider a data table below:
head(airquality)## Ozone Solar.R Wind Temp Month Day
## 1 41 190 7.4 67 5 1
## 2 36 118 8.0 72 5 2
## 3 12 149 12.6 74 5 3
## 4 18 313 11.5 62 5 4
## 5 NA NA 14.3 56 5 5
## 6 28 NA 14.9 66 5 6Suppose that the Month and Day columns are
identification columns. That is, each combination of the two columns
acts as an unique identifier for each observation. If we apply the
melt function to the dataset, all the other variables
are melted into a single measurement,
variable and the numbers in the cells are going to
value.
library(reshape2)## Warning: package 'reshape2' was built under R version 4.3.2head(melt(airquality, id = c("Month", "Day")))## Month Day variable value
## 1 5 1 Ozone 41
## 2 5 2 Ozone 36
## 3 5 3 Ozone 12
## 4 5 4 Ozone 18
## 5 5 5 Ozone NA
## 6 5 6 Ozone 28In practice, we use the melt function for data frames,
where the ID variables and measurement variables have to be specified,
or matrix/array, where the ID variable is the row number and measurement
variables are the elements.
Let’s consider another example. The data below was collected from a sensory experiment conducted at Iowa State University in 2004. The investigators took several measurements on the taste of fries depending on the different fryer oils and frying time combination.
head(french_fries)## time treatment subject rep potato buttery grassy rancid painty
## 61 1 1 3 1 2.9 0.0 0.0 0.0 5.5
## 25 1 1 3 2 14.0 0.0 0.0 1.1 0.0
## 62 1 1 10 1 11.0 6.4 0.0 0.0 0.0
## 26 1 1 10 2 9.9 5.9 2.9 2.2 0.0
## 63 1 1 15 1 1.2 0.1 0.0 1.1 5.1
## 27 1 1 15 2 8.8 3.0 3.6 1.5 2.3According to the description, the time,
treatment, subject, and rep are
the identification variables1. To melt down this data, you can either
specify id.vars or measure.vars:
head(melt(french_fries, id.vars = 1:4))## time treatment subject rep variable value
## 1 1 1 3 1 potato 2.9
## 2 1 1 3 2 potato 14.0
## 3 1 1 10 1 potato 11.0
## 4 1 1 10 2 potato 9.9
## 5 1 1 15 1 potato 1.2
## 6 1 1 15 2 potato 8.8head(melt(french_fries, measure.vars = c("potato", "buttery", "grassy", "rancid", "painty")))## time treatment subject rep variable value
## 1 1 1 3 1 potato 2.9
## 2 1 1 3 2 potato 14.0
## 3 1 1 10 1 potato 11.0
## 4 1 1 10 2 potato 9.9
## 5 1 1 15 1 potato 1.2
## 6 1 1 15 2 potato 8.8You can make the output slightly nicer by specifying variable names and value names:
head(melt(french_fries,
          id.vars = 1:4,
          varnames = "flavor",
          value.name = "flavor_intensity"))
## time treatment subject rep variable flavor_intensity
## 1 1 1 3 1 potato 2.9
## 2 1 1 3 2 potato 14.0
## 3 1 1 10 1 potato 11.0
## 4 1 1 10 2 potato 9.9
## 5 1 1 15 1 potato 1.2
## 6 1 1 15 2 potato 8.8Melting an array doesn’t require you to specify ID variables or measurement variables. It assumes that the ID variables are the row numbers and the measured variable is the measured numbers in the array. For example:
HairEyeColor## , , Sex = Male
##
## Eye
## Hair Brown Blue Hazel Green
## Black 32 11 10 3
## Brown 53 50 25 15
## Red 10 10 7 7
## Blond 3 30 5 8
##
## , , Sex = Female
##
## Eye
## Hair Brown Blue Hazel Green
## Black 36 9 5 2
## Brown 66 34 29 14
## Red 16 7 7 7
## Blond 4 64 5 8head(melt(HairEyeColor), 10)## Hair Eye Sex value
## 1 Black Brown Male 32
## 2 Brown Brown Male 53
## 3 Red Brown Male 10
## 4 Blond Brown Male 3
## 5 Black Blue Male 11
## 6 Brown Blue Male 50
## 7 Red Blue Male 10
## 8 Blond Blue Male 30
## 9 Black Hazel Male 10
## 10 Brown Hazel Male 25Casting
On the other hand, the casting functions transforms
a long-form data into a wide-form. In other words, it
pivots or unmelts data. The
reshape2 has two different types of casting functions:
dcast and acast. We use the dcast
function to return a data frame output and acast function
to return an array output.
Two functions have the same syntax:
*cast(melted_data, col_var_1 + ... + col_var_n ~ row_var_1 + ... + row_var_m, value.var)In the results, the columns will be all possible combinations of
col_var_1 + ... + col_var_n. The rows will be all
combinations of row_var_1 + ... + row_var_m. The
value.var is the value variable, the values that should go
in the cells of the output. For example:
melt_fries <- melt(french_fries, id.vars = 1:4)
head(melt_fries)
## time treatment subject rep variable value
## 1 1 1 3 1 potato 2.9
## 2 1 1 3 2 potato 14.0
## 3 1 1 10 1 potato 11.0
## 4 1 1 10 2 potato 9.9
## 5 1 1 15 1 potato 1.2
## 6 1 1 15 2 potato 8.8dcast_fries <- dcast(melt_fries,
time + treatment ~ subject + rep + variable,
value.var = "value")
# Only display the first 7 columns to save space
head(dcast_fries[,1:7])## time treatment 3_1_potato 3_1_buttery 3_1_grassy 3_1_rancid 3_1_painty
## 1 1 1 2.9 0.0 0.0 0.0 5.5
## 2 1 2 13.9 0.0 0.0 3.9 0.0
## 3 1 3 14.1 0.0 0.0 1.1 0.0
## 4 2 1 9.0 0.3 0.1 5.8 0.3
## 5 2 2 14.1 0.9 0.3 2.1 0.0
## 6 2 3 6.5 0.6 0.7 0.1 1.4Often, you don’t want to use all of the possible variables. When you cast data, each element of the cast table will correspond to more than one measurement, and so they need to be aggregated in some way.
head(melt_fries)## time treatment subject rep variable value
## 1 1 1 3 1 potato 2.9
## 2 1 1 3 2 potato 14.0
## 3 1 1 10 1 potato 11.0
## 4 1 1 10 2 potato 9.9
## 5 1 1 15 1 potato 1.2
## 6 1 1 15 2 potato 8.8For example, let’s say that you want to cast the melted table above, while taking summations within each subject value:
head(dcast(melt_fries, subject ~ variable, value.var = "value"))## subject potato buttery grassy rancid painty
## 1 3 54 54 54 54 54
## 2 10 60 60 60 60 60
## 3 15 60 60 60 60 60
## 4 16 60 60 60 60 60
## 5 19 60 60 60 60 60
## 6 31 54 54 54 54 54You can also use functions other than sum. The
aggregation function can be specified with fun.aggregate in
the *cast. For example:
dcast(melt_fries, subject ~ variable, value.var = "value", fun.aggregate = mean)## subject potato buttery grassy rancid painty
## 1 3 6.083333 0.5759259 0.1296296 2.7000000 2.8185185
## 2 10 9.993333 6.7266667 0.4016667 3.0933333 0.9616667
## 3 15 NA NA NA NA NA
## 4 16 6.601667 NA 0.9783333 3.5733333 0.7466667
## 5 19 8.921667 2.4100000 1.7416667 6.0016667 3.6116667
## 6 31 8.635185 0.5703704 0.1388889 6.1907407 4.4666667
## 7 51 10.293333 3.1883333 1.3233333 4.9116667 2.2516667
## 8 52 5.350000 0.8983333 0.9400000 3.8900000 2.5000000
## 9 63 7.750000 0.0650000 0.0450000 5.7766667 3.7700000
## 10 78 3.800000 0.5783333 0.6533333 1.4133333 3.2450000
## 11 79 7.911111 NA 0.2388889 0.9259259 NA
## 12 86 4.014815 1.8222222 0.8444444 4.7074074 3.3259259Note: gather and spread
function in the tidyr package does roughly the same as
cast and melt.
Merging Data with tidyr
Data merging is the process of combining data from
two or more sources based on common variables. The basic syntax for
merging data in the tidyr package is:
merge(x, y, by.x, by.y)Where x and y are two datasets you want to
merge, by.x and by.y are the columns from
x and y to merge on. For example:
df1 <- data.frame(df1_id = c(1, 2, 3), name = c("John", "Jane", "Bob"))
df2 <- data.frame(df2_id = c(2, 3, 4), age = c(25, 30, 40))

# merge the two data frames based on the "id" variable
merged <- merge(df1, df2, by.x = "df1_id", by.y = "df2_id")

merged
## df1_id name age
## 1 2 Jane 25
## 2 3 Bob 30Note: If x and y share the
common variable names to merge on, you can just use by.
By default, the output dataset only contains observations that is
both available on x and y in terms of
by variable2. You can adjust this by specifying
all, all.x, or all.y parameter.
all = TRUE means that you get one row for values of merging
variables that were seen in either x or y3.
merged_all <- merge(df1, df2, by.x = "df1_id", by.y = "df2_id", all = TRUE)
merged_all
## df1_id name age
## 1 1 John NA
## 2 2 Jane 25
## 3 3 Bob 30
## 4 4 <NA> 40Specifying all.x = TRUE means you get one row for each
value of the merging variable that was seen in x4 and
all.y = TRUE means you get one row for each value of the
merging variable that was seen in y5.
merged_x <- merge(df1, df2, by.x = "df1_id", by.y = "df2_id", all.x = TRUE)
merged_x
## df1_id name age
## 1 1 John NA
## 2 2 Jane 25
## 3 3 Bob 30merged_y <- merge(df1, df2, by.x = "df1_id", by.y = "df2_id", all.y = TRUE)
merged_y## df1_id name age
## 1 2 Jane 25
## 2 3 Bob 30
## 3 4 <NA> 40time: time in weeks from start of study,treatment: types of oil,subject: assigned ID numbers to each combination oftimeandtreatment,rep: replication ID of the experiment↩︎Also known as inner joins↩︎
Also known as full outer joins↩︎
Also known as left outer joins↩︎
Also known as right outer joins↩︎